2. WORKING WITH MAPS
2.1. The Web-GIS map page
The Web-GIS map page is intended for interactive work with the Web-GIS map: selecting topics about school and pre-school safety, viewing geographical sites on the map according to topics selected, changing scale and movement on the map, familiarizing users with the language of map annotations, entry of usernames and passwords, and providing access to the website’s help page and other pages.
The Web-GIS map page consists of three parts: heading area, topic selection area and map area.
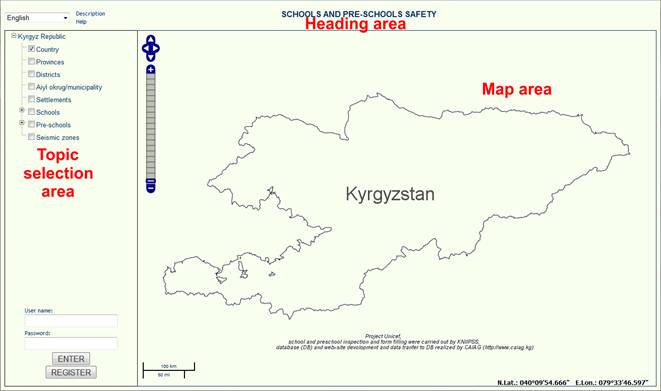
Figure 2.1. General view of the Web-GIS map page when the site is initially accessed
2.2. Heading area
The following items are located in the heading area (left to right):
· Language switch
· Links to “Description” and “Help”
· Heading “SCHOOL AND PRE-SCHOOL SAFETY”
· Link to “Tables” (only appears at access levels 2 and 3)
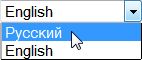
Language switch serves to change the language of the text displayed on the screen. To switch language, bring your mouse cursor to the switch
![]()
and left-click your mouse. In the drop-down menu, select the language required and left-click your selection.
The “Description” link allows you to go to a page containing information about the project and a general description of the Information System. To go to this page, bring your mouse cursor to this link and left-click your mouse.
The “Help” link redirects you to a page containing information about the Web-GIS map page.
The “Tables” link takes a user to a page where he/she can see information in tables.
![]()
This link only appears after a user enters his or her level 2 or 3 username and password (see par. 1.3).
2.3. Topic selection area
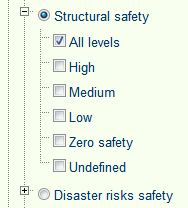
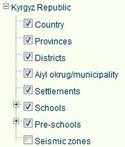
The topic selection area contains a list of all topics – labels – that can be reflected on a map. These include administrative formations: country (Kyrgyzstan), provinces, districts, aiyl okrug/municipality and settlements. They are followed by labels indicating schools and pre-schools. These are eventually concluded by a label called “Seismic zones.”
If the
rectangle under a label is checked ![]() , this label is reflected
on the map. Otherwise, it will not be shown -
, this label is reflected
on the map. Otherwise, it will not be shown - ![]() . In such a case, it is impossible to
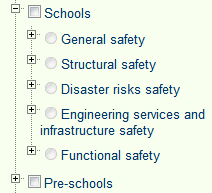
perform operations using this label. Figure 2.1 shows that only the “country”
label is displayed while other labels are concealed. The same Figure shows that
in front of the labels “Schools” and “Pre-schools” are small “+” icons set in
squares enabling other categories to open out underneath them. Left-click on
one of the “+” icons and you find a
. In such a case, it is impossible to
perform operations using this label. Figure 2.1 shows that only the “country”
label is displayed while other labels are concealed. The same Figure shows that
in front of the labels “Schools” and “Pre-schools” are small “+” icons set in
squares enabling other categories to open out underneath them. Left-click on
one of the “+” icons and you find a
![]() ,
,
corresponding set of labels, each label with a “+” button placed before them.
.
Any of these buttons can be selected having selected the master label, in this case “Schools”.
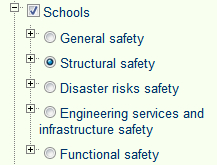
Any of the five labels beneath the master label may be opened. As a result, you will be able to check a third set of labels that select/unselect schools/pre-schools on the map according to a given safety level.
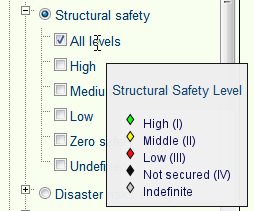
Legend: If you bring your mouse cursor to any of the labels in the topic selection area, you will see a small legend window on your screen with symbols reflecting objects on the maps accompanied by explanations.
2.4. Authorization and registration
Authorization is performed by entering a username and password to confirm higher information access rights. For this purpose, the lower part of the topic selection area contains two fields, and you must enter your username into the upper one and your password into the lower one.

After entering the information required and pressing “ENTER,” the program will go into an authorized access mode under which all information about safety of schools and pre-schools present in the project database becomes available for viewing. Without authorization, you can only select topics, view maps and obtain brief information about the objects on the map.
To earn rights to fully access the data system, registration is a necessary prerequisite. To register, place the mouse cursor on the “REGISTER” button and left-click the mouse, then you will be transferred to the new page Registration form. This page consists of:
ü Page name (as with other pages)
ü Table with form
ü Operation buttons
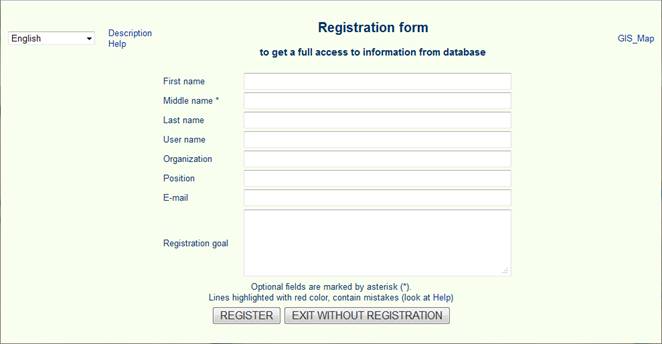
Insert your personal data into the form: first name, middle name (optional), last name, and user name, name of organization, position, e-mail address and your goal in registering. Press the Register button. In case of incorrect completion, registration will not take place and fields where errors were entered will be indicated in red. Possible errors include empty fields and incorrect e-mail addresses. The user name may consist of English letters, numbers, dots, dashes ("-") and underscores ("_"). If the form is completed correctly, your personal data will be delivered to the site administrator, who will send you a password to access the site in addition to your user name following user clearance. If you do not wish to register, click on the Exit without registration button.
2.5. Map area
The map area graphically reflects all labels selected in the topic list. In addition to the map itself, there are also tools and information needed to work with the map.
In the top
left corner, you can find a tool “Arrows” ![]() ,
used to move the map in various directions. You can move the map in other ways
too. In order to do so, bring your mouse cursor to the map area, left-click and
hold, then drag the map’s image in the required direction.
,
used to move the map in various directions. You can move the map in other ways
too. In order to do so, bring your mouse cursor to the map area, left-click and
hold, then drag the map’s image in the required direction.
![]() Under
the “Arrows” tool, you can find a tool called “Scale.” If you
click on the “+” sign, the scale of the map increases, if you click on the “-”
sign, it decreases. In order to change the scale you can also bring your mouse
cursor to any point on the scale and left-click on it. The map scale can also
be changed by scrolling up or down using your mouse scroll wheel. (Scroll up to
increase the scale, scroll down to decrease it.) Another way to increase the
map size is to bring your mouse cursor to the top left corner of the imaginary
rectangular area on the map and then bring the cursor to the map’s bottom right
corner, left–clicking without holding.
Under
the “Arrows” tool, you can find a tool called “Scale.” If you
click on the “+” sign, the scale of the map increases, if you click on the “-”
sign, it decreases. In order to change the scale you can also bring your mouse
cursor to any point on the scale and left-click on it. The map scale can also
be changed by scrolling up or down using your mouse scroll wheel. (Scroll up to
increase the scale, scroll down to decrease it.) Another way to increase the
map size is to bring your mouse cursor to the top left corner of the imaginary
rectangular area on the map and then bring the cursor to the map’s bottom right
corner, left–clicking without holding.
In the bottom left corner you can find the “Scale ruler” with divisions in kilometers and miles
![]()
and to the right you can find the coordinates of the point under your cursor.
![]()
The
border between the topic selection area and map area can be moved. Bring your
mouse cursor to the border until it turns into a bidirectional arrow ![]() and drag the border to the
right or left while left-clicking with your mouse.
and drag the border to the
right or left while left-clicking with your mouse.
2.6. Brief information about objects on the map
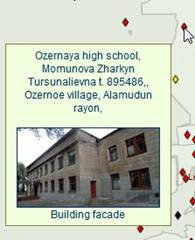
If you bring your mouse cursor to a school or pre-school’s symbol on the map (without clicking your mouse), in a couple of seconds you will see a small window on the screen showing the caption for the selected school/pre-school, containing the name of the settlement and photos of the school/pre-school.
If you bring your mouse cursor to any object on the map and left-click on it, you will see a small window containing brief information about all the labels available under the cursor as selected in the topic selection list.
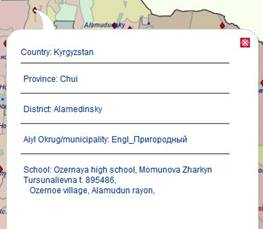
On the image shown above (right) you can see a pop-up window containing a list of objects located on the map under your mouse cursor and located in layers selected in the topic selection list (image to the left). If you bring your mouse cursor to any line in the pop-up window and left-click on it, some brief information about the selected object will appear beneath.
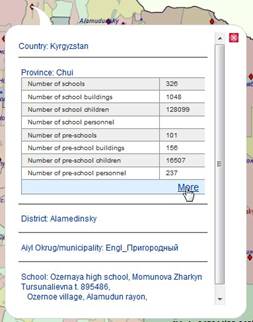
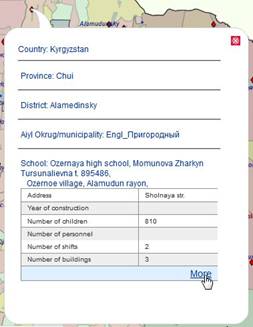
For instance, on the image shown above (left), you can see information about Chui province, and on the right image you can see information about the school in Ozernoe village. Full information about any object on the map can only be obtained by authorized users of the database. If you are an authorized user, bring your mouse cursor to the word “More” and left-click on it. A new page will open on your screen containing information in tables.
You can close the window by pressing a red square with a white cross on it in the top right corner.